Any wall-mount sign deserves a solid installation for a safe and sturdy wall mount. With a few easy steps, you can install your exit signs, safety signs, and information signs to comply with regulations and suit the needs of your environment. Don't be intimidated-- an effective wall mount is easier than it looks. Just follow our basic instructions for proper ADA measurements, and choose an installation method that works best for you. Most installations can be done in just a few minutes.
The Basics
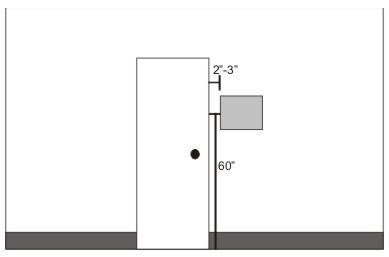
Make sure your surface is smooth and clean, since a clean surface will allow for the best adherence possible. When choosing an appropriate height, it is good to know that ADA protocol requires the center of your sign to be 60 inches above your floor . For wall signs near a door, ADA requires signs to mount on the latched side of the door, about 2 to 3 inches from the door jamb. If there are double doors, the sign should be to the right. If there is no available wall space, post the sign on the nearest adjacent wall. For more information on ADA guidelines, download the full set of regulations here.
For Perpendicular and Ceiling-Mounted Signs:
ADA requires that projecting perpendicular signs or overhead signs have an
84-inch clearance from the floor to the bottom of the sign to avoid head
injury. Signs cannot block doors, emergency supplies, or sprinklers. Use a level
to ensure a straight installation, and fasten the wall mounting bracket into the
wall. For certain walls, you make need wall anchors before fastening the wall-mount
hardware.

There are three methods to install your wall sign:
Adhesive tape. Have a level ready to ensure a straight installation. Remove the adhesive backing and press the sign to the wall for 30 seconds.
Screw Mounting. Use a level to ensure straight installation, then mark the wall through the screw holes in your sign. Drill into your markings and insert proper wall anchors. Hold the sign on the wall and fasten the screws into the wall anchors.
Silicone Sealant. Silicone sealing provides extra stability for heavier signs, signs installed on uneven surfaces, or outdoor signs. Always follow the manufacturer instructions to use your silicone adhesive properly. Used in addition to an adhesive tape backing, apply the silicone sealant onto the entire back of your sign, and press firmly onto the desired surface. As always, use a level to ensure an even installation. You can find different silicone sealants and adhesives here, or at your local hardware store.